ChatGPT can give some impressive results, and also sometimes some very poor advice. But while it’s free to talk with ChatGPT in theory, often you end up with messages about the system being at capacity, or hitting your maximum number of chats for the day, with a prompt to subscribe to ChatGPT Plus. Also, all of your queries are taking place on ChatGPT’s server, which means that you need Internet and that OpenAI can see what you’re doing.
Fortunately, there are ways to run a ChatGPT-like LLM (Large Language Model) on your local PC, using the power of your GPU. The oogabooga text generation webui (opens in new tab) might be just what you’re after, so we ran some tests to find out what it could — and couldn’t! — do, which means we also have some benchmarks.
Getting the webui running wasn’t quite as simple as we had hoped, in part due to how fast everything is moving within the LLM space. There are the basic instructions in the readme, the one-click installers, and then multiple guides for how to build and run the LLaMa 4-bit models (opens in new tab). We encountered varying degrees of success/failure, but with some help from Nvidia and others, we finally got things working. And then the repository was updated and our instructions broke, but a workaround/fix was posted today. Again, it’s moving fast!
It’s like running Linux and only Linux, and then wondering how to play the latest games. Sometimes you can get it working, other times you’re presented with error messages and compiler warnings that you have no idea how to solve. We’ll provide our version of instructions below for those who want to give this a shot on their own PCs. You may also find some helpful people in the LMSys Discord (opens in new tab), who were good about helping me with some of my questions.
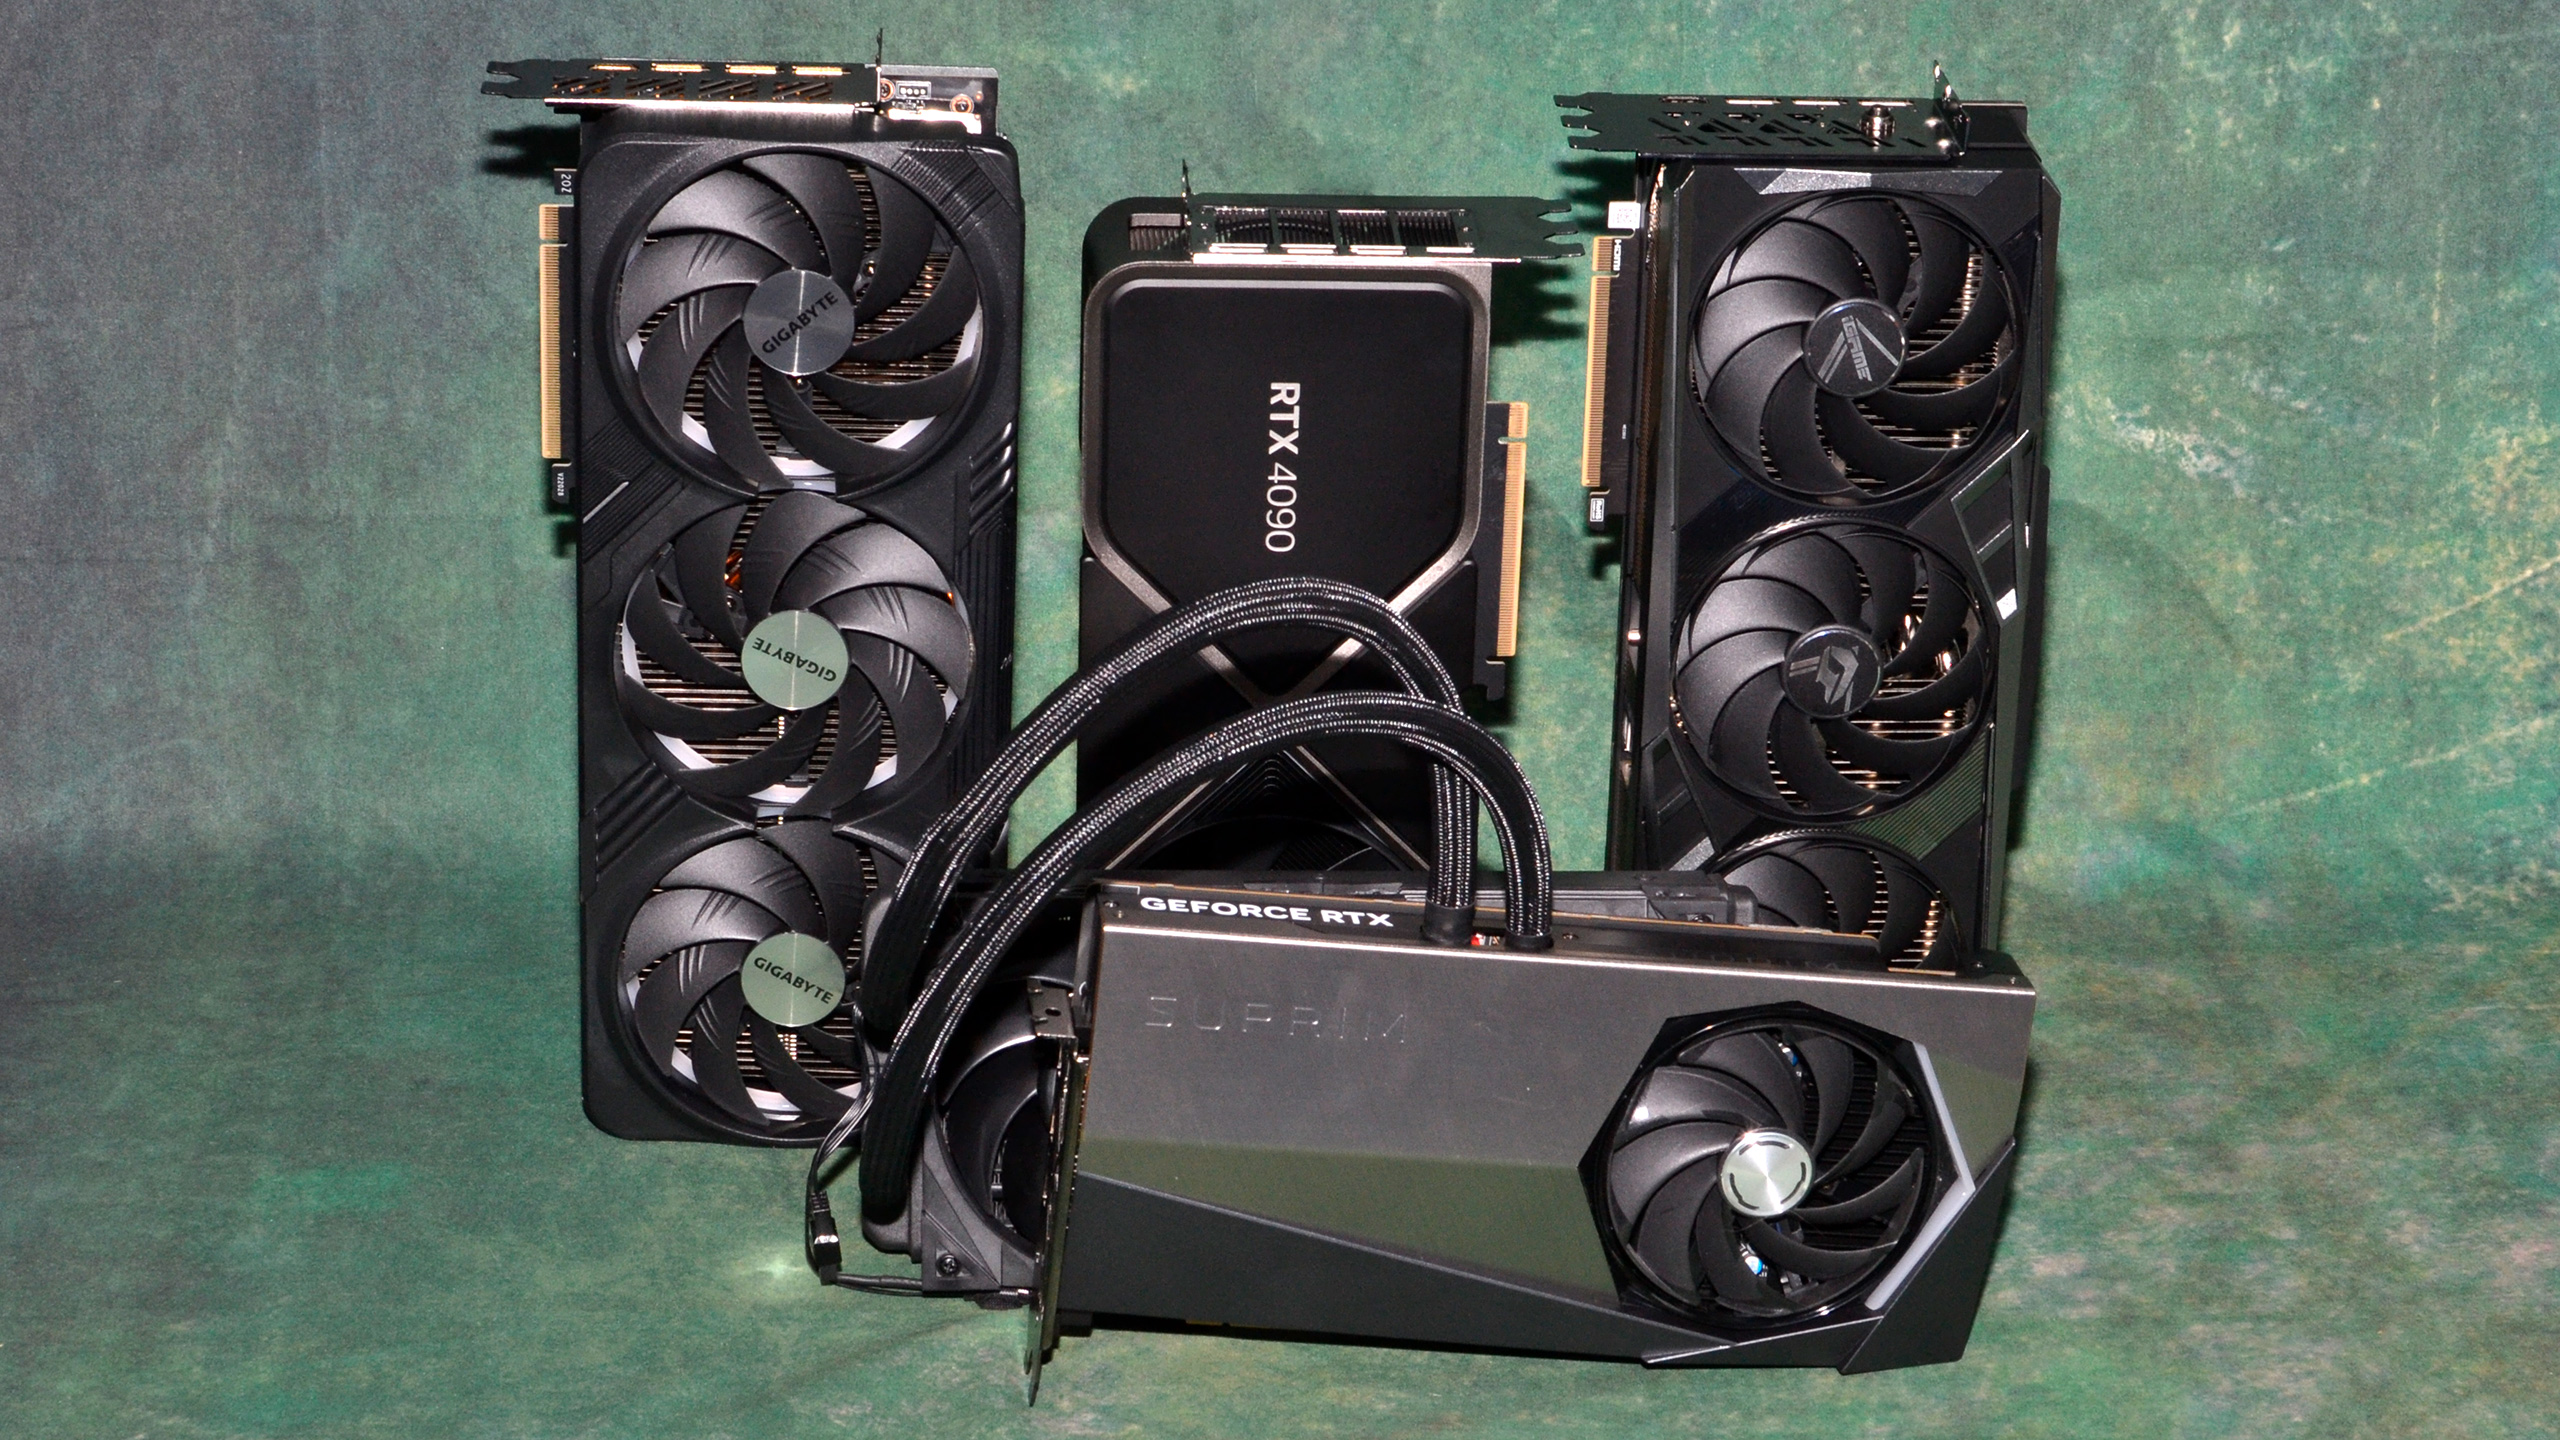
It might seem obvious, but let’s also just get this out of the way: You’ll need a GPU with a lot of memory, and probably a lot of system memory as well, should you want to run a large language model on your own hardware — it’s right there in the name. A lot of the work to get things running on a single GPU (or a CPU) has focused on reducing the memory requirements.
Using the base models with 16-bit data, for example, the best you can do with an RTX 4090, RTX 3090 Ti, RTX 3090, or Titan RTX — cards that all have 24GB of VRAM — is to run the model with seven billion parameters (LLaMa-7b). That’s a start, but very few home users are likely to have such a graphics card, and it runs quite poorly. Thankfully, there are other options.
Loading the model with 8-bit precision cuts the RAM requirements in half, meaning you could run LLaMa-7b with many of the best graphics cards — anything with at least 10GB VRAM could potentially suffice. Even better, loading the model with 4-bit precision halves the VRAM requirements yet again, allowing for LLaMa-13b to work on 10GB VRAM. (You’ll also need a decent amount of system memory, 32GB or more most likely — that’s what we used, at least.)
Getting the models isn’t too difficult at least, but they can be very large. LLaMa-13b for example consists of 36.3 GiB download for the main data (opens in new tab), and then another 6.5 GiB for the pre-quantized 4-bit model (opens in new tab). Do you have a graphics card with 24GB of VRAM and 64GB of system memory? Then the 30 billion parameter model (opens in new tab) is only a 75.7 GiB download, and another 15.7 GiB for the 4-bit stuff. There’s even a 65 billion parameter model, in case you have an Nvidia A100 40GB PCIe (opens in new tab) card handy, along with 128GB of system memory (well, 128GB of memory plus swap space). Hopefully the people downloading these models don’t have a data cap on their internet connection.
Testing Text Generation Web UI Performance
In theory, you can get the text generation web UI running on Nvidia’s GPUs via CUDA, or AMD’s graphics cards via ROCm. The latter requires running Linux, and after fighting with that stuff to do Stable Diffusion benchmarks earlier this year, I just gave it a pass for now. If you have working instructions on how to get it running (under Windows 11, though using WSL2 is allowed) and you want me to try them, hit me up and I’ll give it a shot. But for now I’m sticking with Nvidia GPUs.
I also encountered some fun errors when trying to run the llama-13b-4bit models on older Turing architecture cards like the RTX 2080 Ti and Titan RTX. Everything seemed to load just fine, and it would even spit out responses and give a tokens-per-second stat, but the output was garbage. So the only testing right now is for Ampere and Ada Lovelace cards that have at least 10GB of VRAM. That’s still nine different GPUs, though the performance seems to depend on many other factors besides just the raw GPU number crunching prowess.
Update: Starting with a fresh environment while running a Turing GPU seems to have worked. We’ll have Turing results shortly, and will recheck a few of the other numbers to ensure things remained consistent.
For these tests, we used a Core i9-12900K running Windows 11. You can see the full specs in the boxout. We used reference Founders Edition models for most of the GPUs, though there’s no FE for the 4070 Ti, 3080 12GB, or 3060, and we only have the Asus 3090 Ti.
In theory, there should be a pretty massive difference between the fastest and slowest GPUs in that list. In practice, at least using the code that we got working, other bottlenecks are definitely a factor. It’s not clear whether we’re hitting VRAM latency limits, CPU limitations, or something else, but your CPU definitely plays a role. We tested an RTX 4090 on a Core i9-9900K and the 12900K, for example, and the latter was almost twice as fast.
Given the rate of change happening with the research, models, and interfaces, it’s a safe bet that we’ll see plenty of improvement in the coming days. So, don’t take these performance metrics as anything more than a snapshot in time. We may revisit the testing at a future date, hopefully with additional tests on non-Nvidia GPUs.
We ran oogabooga’s web UI with the following, for reference. More on how to do this below.
python server.py --gptq-bits 4 --model llama-13bText Generation Web UI Benchmarks
Again, we want to preface the charts below with the following disclaimer: These results don’t necessarily make a ton of sense if we think about the traditional scaling of GPU workloads. Normally you end up either GPU compute constrained, or limited by GPU memory bandwidth, or some combination of the two. There are definitely other factors at play with this particular AI workload, and we have some additional charts to help explain things a bit.
We ran the test prompt 30 times on each GPU, with a maximum of 500 tokens. We discarded any results that had fewer than 400 tokens (because those do less work), and also discarded the first two runs (warming up the GPU and memory). Then we sorted the results by speed and took the average of the remaining ten fastest results.
Generally speaking, the speed of response on any given GPU was pretty consistent, within a 7% range at most on the tested GPUs, and often within a 3% range. That’s on one PC, however; on a different PC with a Core i9-9900K and an RTX 4090, our performance was around 40 percent slower than on the 12900K.
Our prompt for the following charts was: “How much computational power does it take to simulate the human brain?”
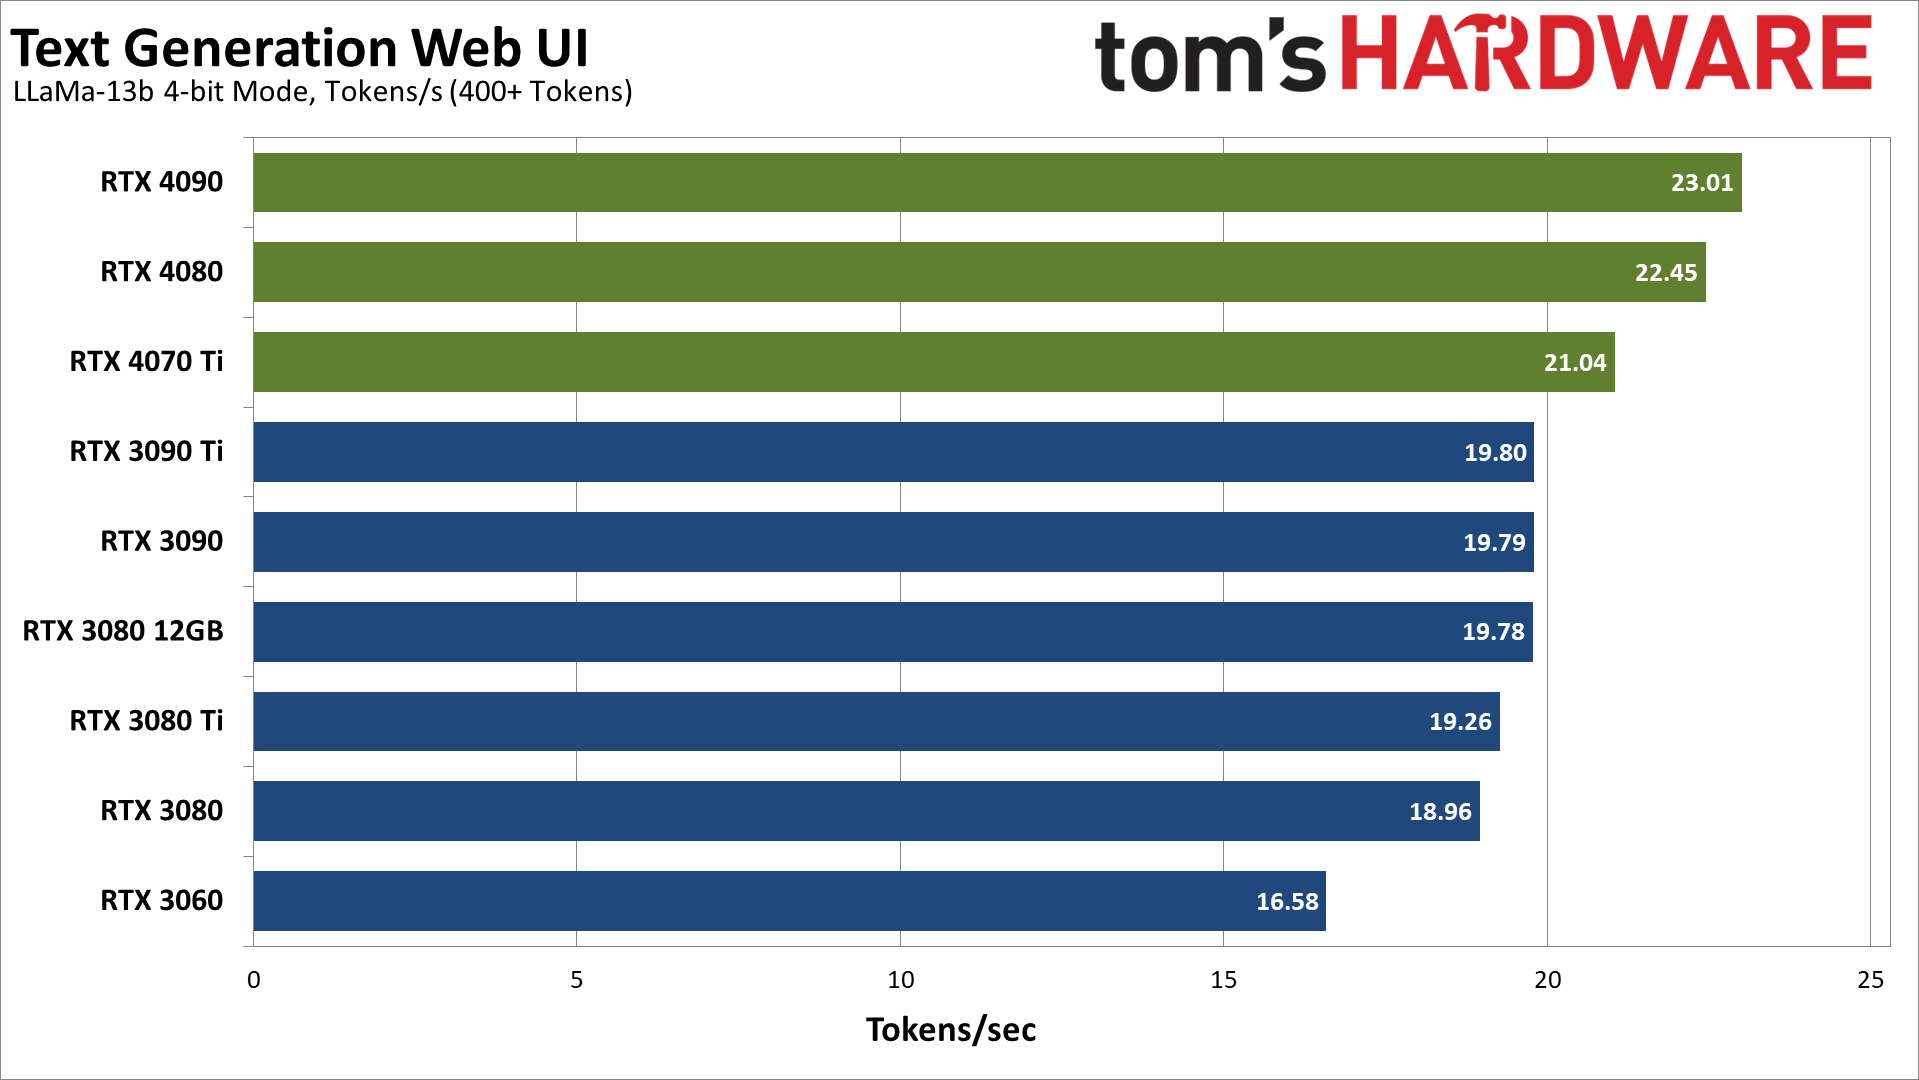
Our fastest GPU was indeed the RTX 4090, but… it’s not really that much faster than other options. Considering it has roughly twice the compute, twice the memory, and twice the memory bandwidth as the RTX 4070 Ti, you’d expect more than a 9% improvement in performance. That didn’t happen, not even close.
The situation with RTX 30-series cards isn’t all that different. The RTX 3090 Ti comes out as the fastest Ampere GPU for these AI Text Generation tests, but it’s tied with the RTX 3090 and RTX 3080 12GB, while the RTX 3080 Ti and RTX 3080 are only slightly behind. Meanwhile, the RTX 3060 still delivers pretty reasonable performance. It’s far less than half the theoretical compute of the 3090 Ti, with just over a third of the memory bandwidth, and yet in our tests it delivered 84% of the performance.
Which isn’t to say that everyone interested in getting involved in AI LLMs should run out and buy RTX 3060 or RTX 4070 Ti cards. We recommend the exact opposite, as the cards with 24GB of VRAM are able to handle more complex models, which can lead to better results. And even the most powerful consumer hardware still pales in comparison to data center hardware — Nvidia’s A100 can be had with 40GB or 80GB of HBM2e, while the newer H100 defaults to 80GB. I certainly won’t be shocked if eventually we see an H100 with 160GB of memory, though Nvidia hasn’t said it’s actually working on that.
As an example, the 4090 (and other 24GB cards) can all run the LLaMa-30b 4-bit model, whereas the 12GB cards are at their limit with the 13b model. 165b models also exist, which would require at least 80GB of VRAM and probably more, plus gobs of system memory. And that’s just for inference; training workloads require even more memory!
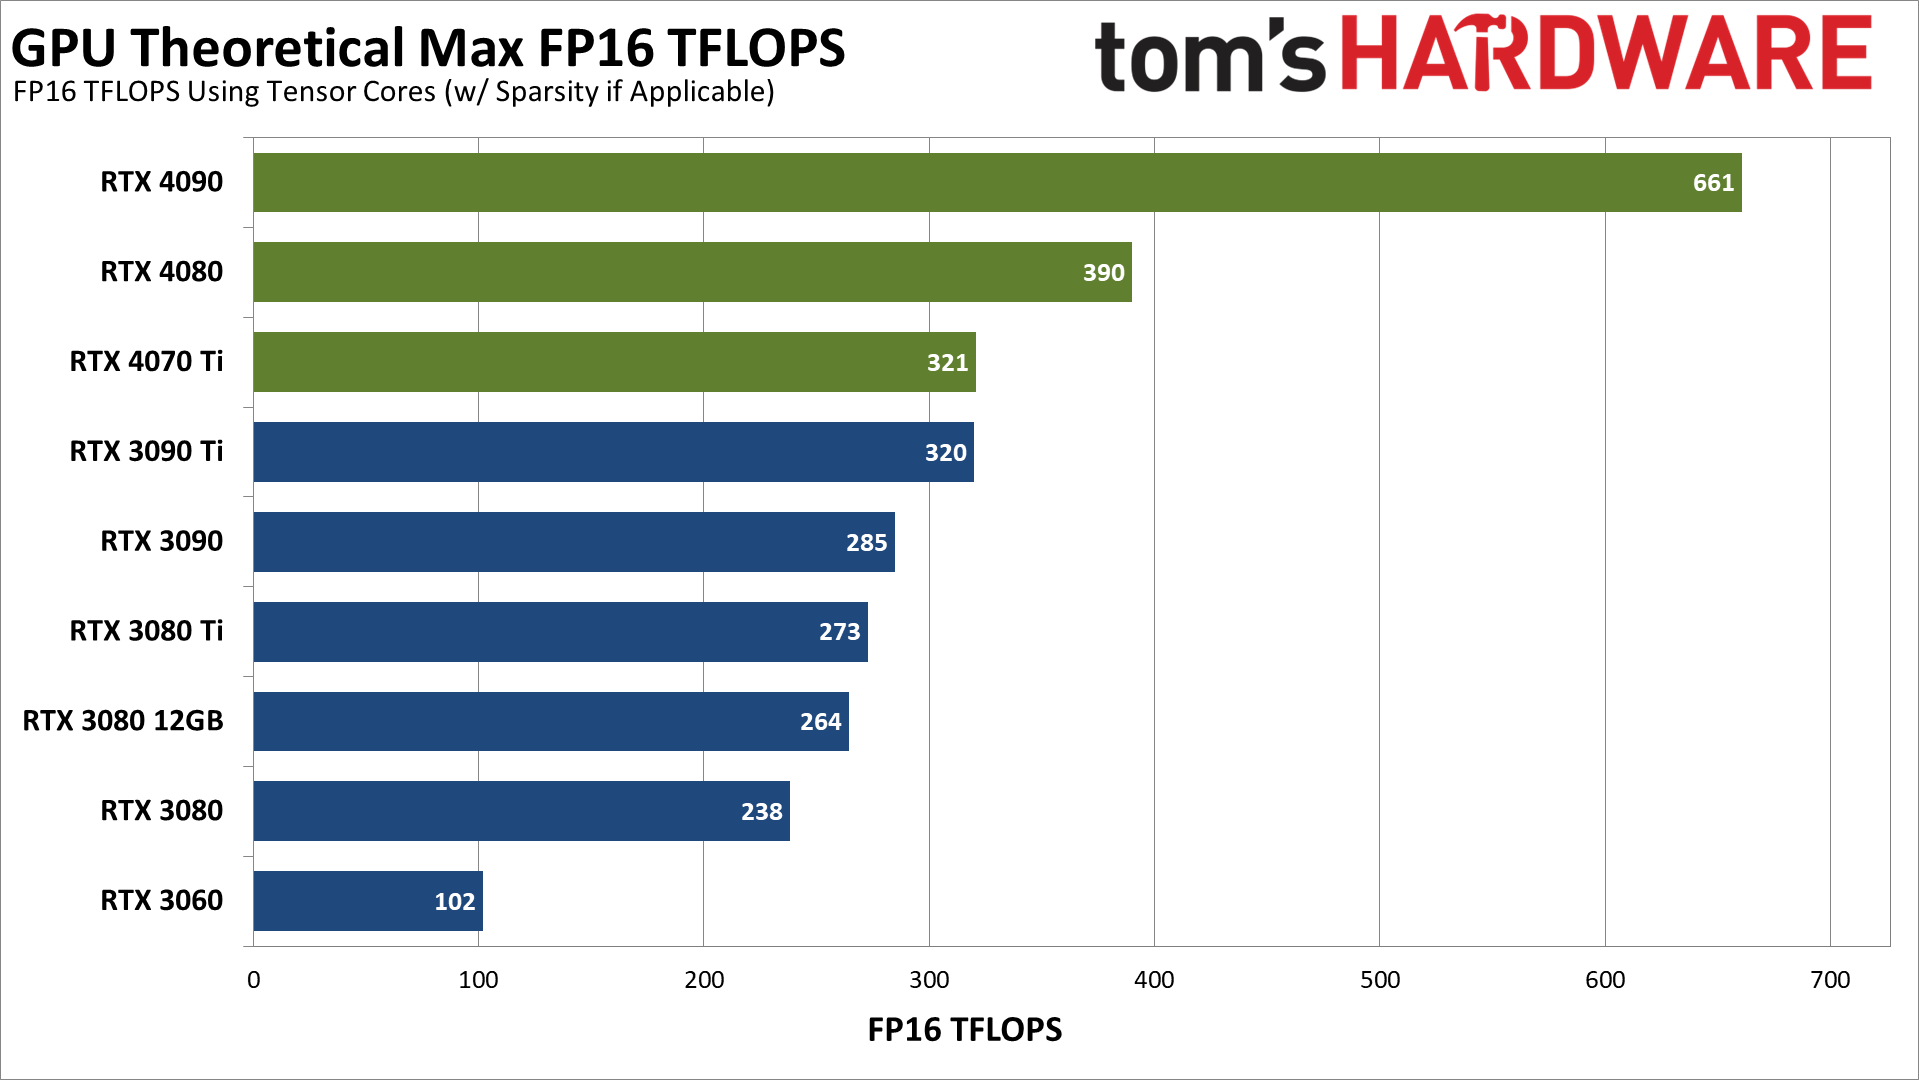
Here’s a different look at the various GPUs, using only the theoretical FP16 compute performance. Now, we’re actually using 4-bit integer inference on the Text Generation workloads, but integer operation compute (Teraops or TOPS) should scale similarly to the FP16 numbers. Also note that the Ada Lovelace cards have double the theoretical compute when using FP8 instead of FP16, but that isn’t a factor here.
If there are inefficiencies in the current Text Generation code, those will probably get worked out in the coming months, at which point we could see more like double the performance from the 4090 compared to the 4070 Ti, which in turn would be roughly triple the performance of the RTX 3060.
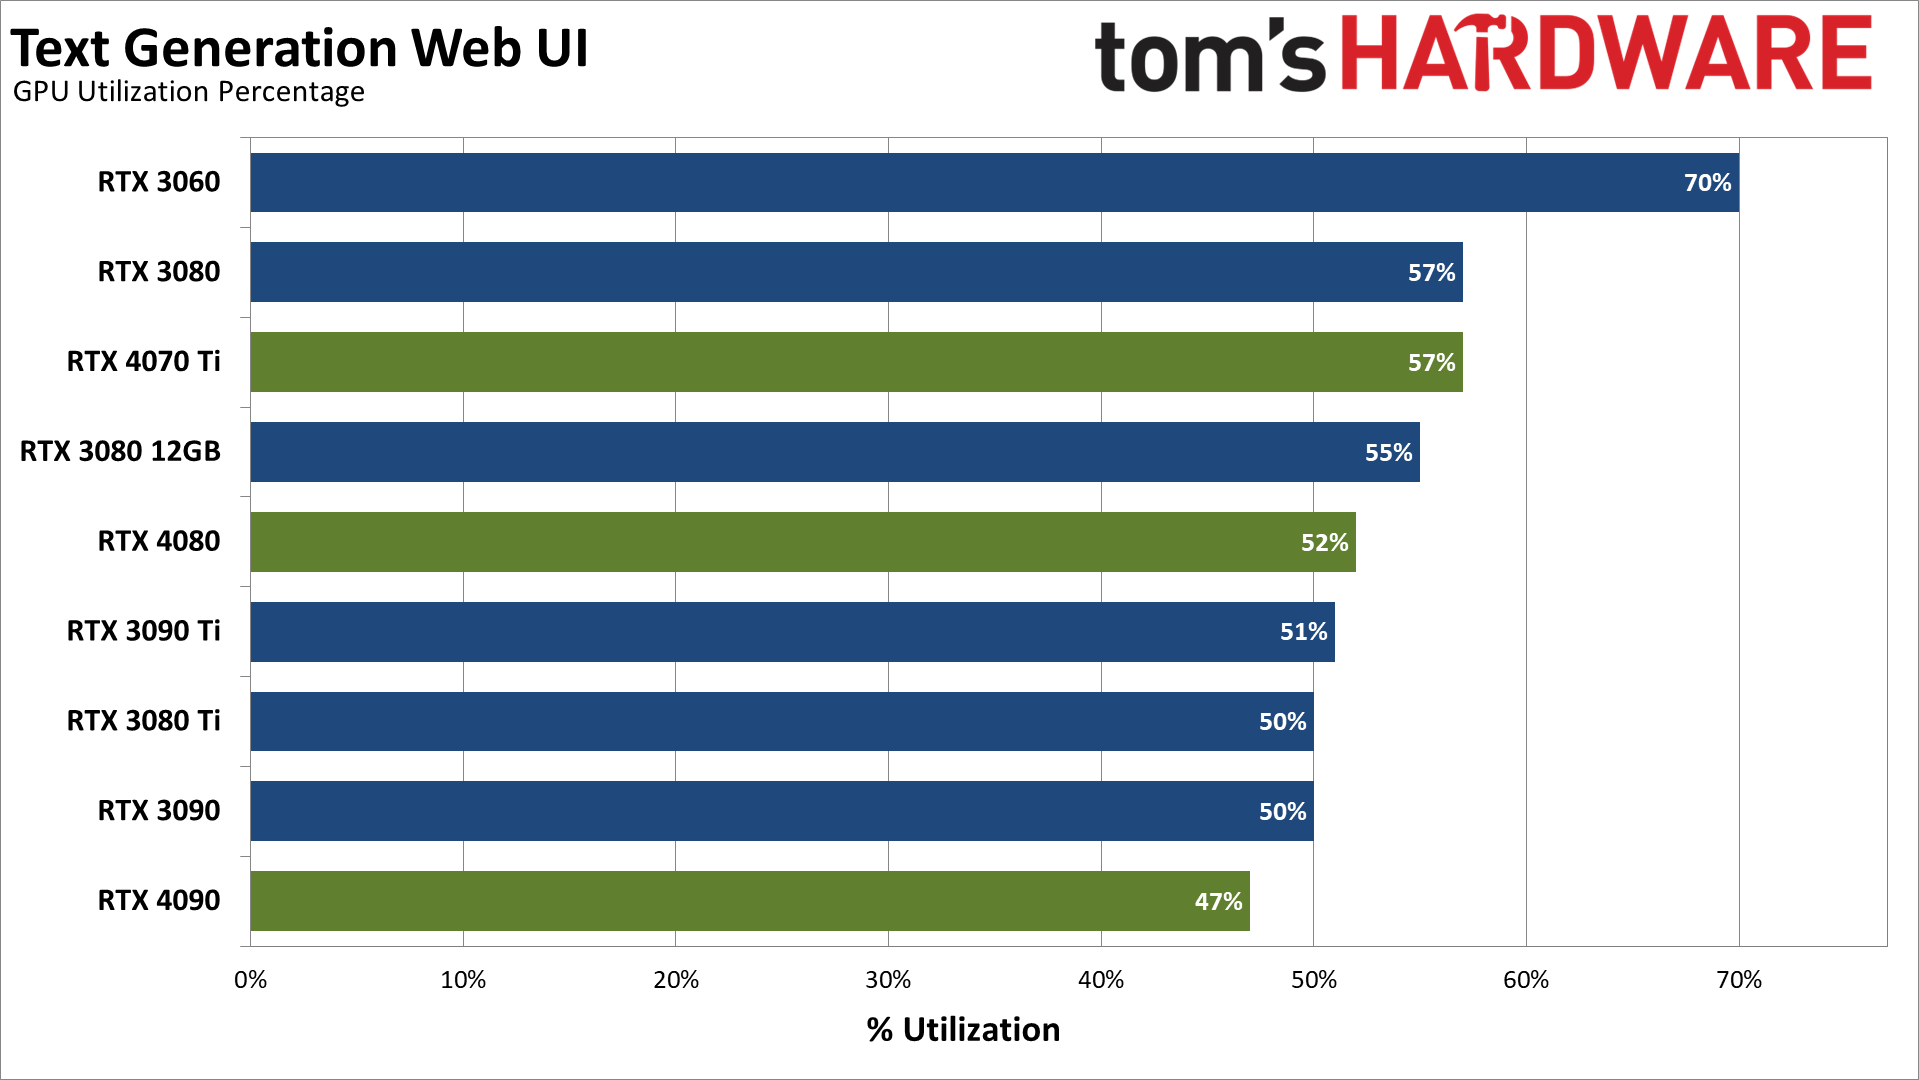
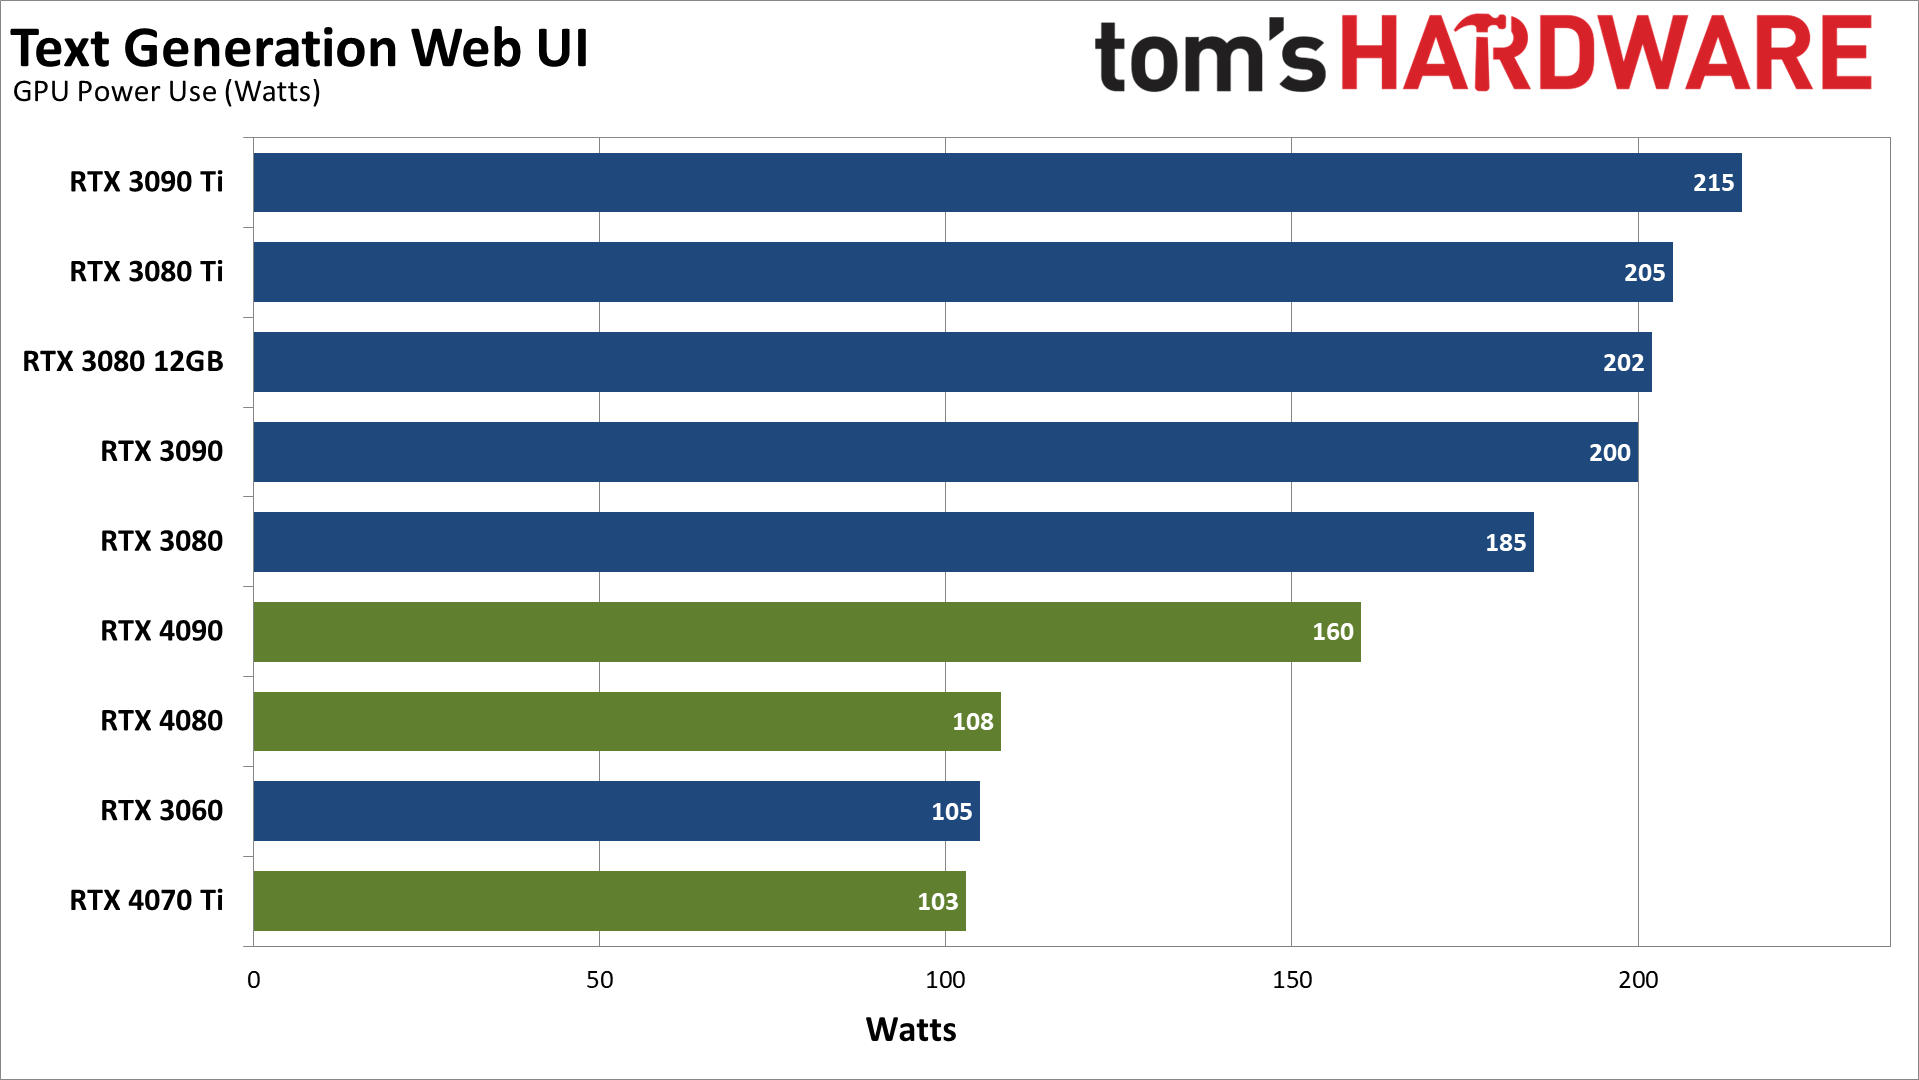
These final two charts are merely to illustrate that the current results may not be indicative of what we can expect in the future. Running Stable-Diffusion for example, the RTX 4070 Ti hits 99–100 percent GPU utilization and consumes around 240W, while the RTX 4090 nearly doubles that — with double the performance as well.
Long term, we expect the various chatbots — or whatever you want to call these “lite” ChatGPT experiences — to improve significantly. Speaking of which, let’s talk about what sort of information you can get from text-generation-webui.
Chatting With Text Generation Web UI
The Text Generation project doesn’t make any claims of being anything like ChatGPT, and well it shouldn’t. ChatGPT will at least attempt to write poetry, stories, and other content. In its default mode, TextGen running the LLaMa-13b model is more like asking a really slow Google to provide text summaries of a question.
Many of the responses to our query about simulating a human brain appear to be copied from forums, Usenet, Quora, or various other websites. That makes the 15~24 tokens (words) per second response times seem ludicrous. Once it’s looked up some data in its training, it should just spit out the whole quote. Maybe it’s actually generating the response using an AI model, but when it puts in things like “Jason, age 17” after a quote, that doesn’t really seem likely.
Again, ChatGPT this is not. But you can run it in a different mode than the default. Passing “–cai-chat” for example gives you a modified interface and an example character to chat with, Chiharu Yamada. And if you like relatively short responses that sound a bit like they come from a teenager, the chat might pass muster. It just won’t provide much in the way of deeper conversation, at least in my experience.
Perhaps you can give it a better character or prompt; there are examples out there. There are plenty of other LLMs as well. You could probably even configure it to respond to people on the web, and since it’s not actually “learning” — there’s no training taking place on the existing models you run — at least it won’t turn into Microsoft’s Tay Twitter bot after 4chan and the internet start interacting with it. Just don’t expect it to write coherent essays for you.
Getting Text-Generation-Webui to Run (on Nvidia)
Given the instructions on the project’s main page (opens in new tab), you’d think getting this up and running would be pretty straightforward. I’m here to tell you that it’s not, especially if you want to use some of the more interesting models. But it can be done. The base instructions for example tell you to use Miniconda on Windows. If you follow the instructions, you end up with a CUDA error. Oops.
This more detailed set of instructions off Reddit (opens in new tab) should work, at least for loading in 8-bit mode. The main issue with CUDA gets covered in steps 7 and 8, where you download a CUDA DLL and copy it into a folder, then tweak a few lines of code. Download an appropriate model and you should hopefully be good to go. The 4-bit instructions totally failed for me the first times I tried them (update: they seem to work now, though they’re using a different version of CUDA than our instructions). lxe has these alternative instructions (opens in new tab), which also didn’t quite work for me.
I got everything working eventually, with some help from Nvidia. The instructions I used are below… but then things stopped working on March 16, 2023, as the LLaMaTokenizer spelling was changed to “LlamaTokenizer” and the code failed. What will break next, and then get fixed a day or two later? We can only guess, but as of March 18, 2023, these instructions worked on several different test PCs.
1. Install Miniconda for Windows using the default options. The top “Miniconda3 Windows 64-bit” link should be the right one to download.
2. Download and install Visual Studio 2019 Build Tools (opens in new tab). Only select “Desktop Environment with C++” when installing. Version 16.11.25 from March 14, 2023, build 16.11.33423.256 should work.
3. Create a folder for where you’re going to put the project files and models., e.g. C:\AIStuff.
4. Launch Miniconda3 prompt. You can find it by searching Windows for it or on the Start Menu.
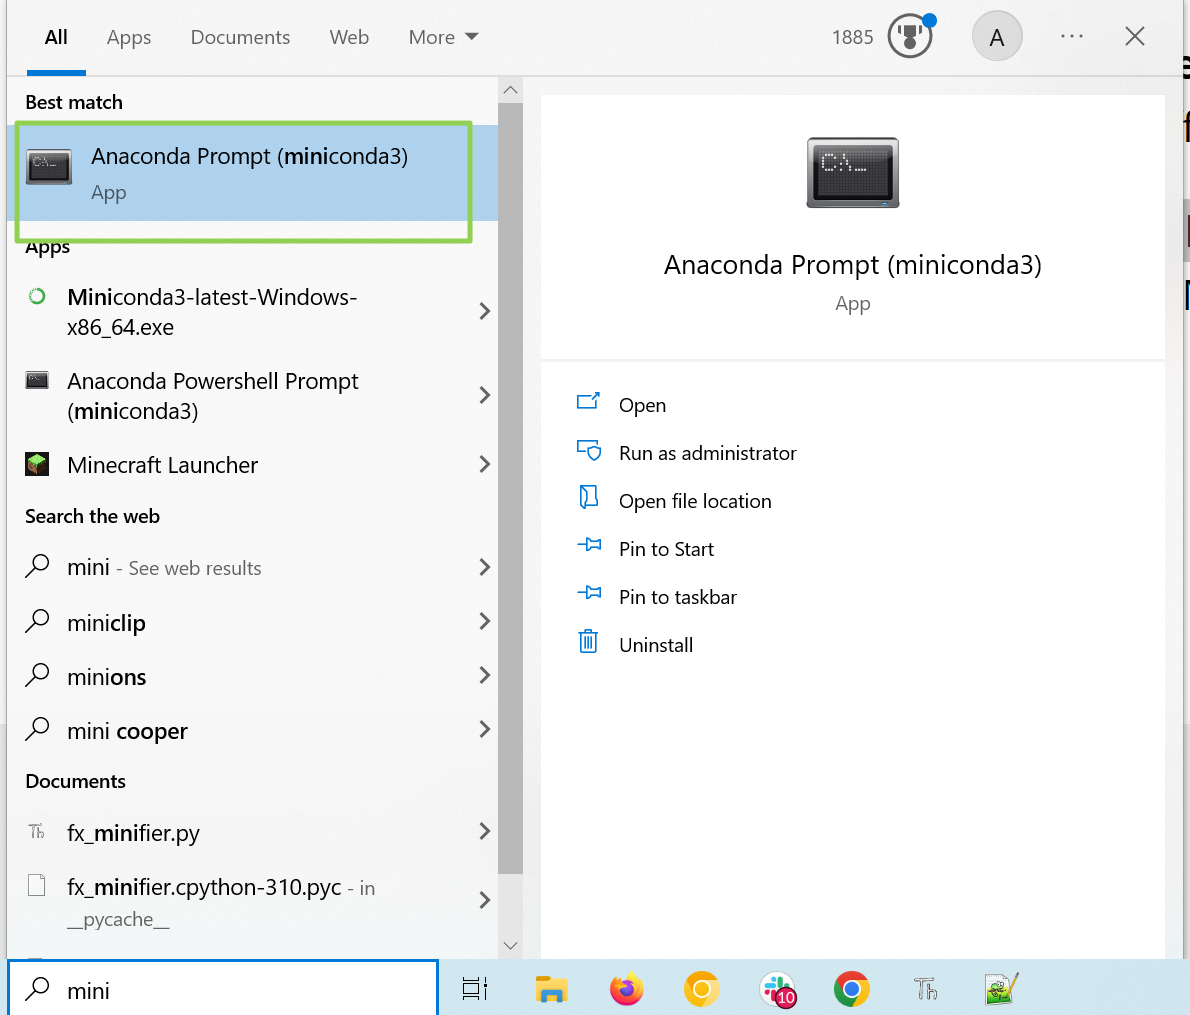
5. Run this command, including the quotes around it. It sets the VC build environment so CL.exe can be found, requires Visual Studio Build Tools from step 2.
"C:\Program Files (x86)\Microsoft Visual Studio\2019\BuildTools\VC\Auxiliary\Build\vcvars64.bat"6. Enter the following commands, one at a time. Enter “y” if prompted to proceed after any of these.
conda create -n llama4bit
conda activate llama4bit
conda install python=3.10
conda install git
7. Switch to the folder (e.g. C:\AIStuff) where you want the project files.
cd C:\AIStuff8. Clone the text generation UI with git.
git clone https://github.com/oobabooga/text-generation-webui.git9. Enter the text-generation-webui folder, create a repositories folder underneath it, and change to it.
cd text-generation-webui
md repositories
cd repositories
10. Git clone GPTQ-for-LLaMa.git and then move up one directory.
git clone
cd ..
11. Enter the following command to install several required packages that are used to build and run the project. This can take a while to complete, sometimes it errors out. Run it again if necessary, it will pick up where it left off.
pip install -r requirements.txt12. Use this command to install more required dependencies. We’re using CUDA 11.7.0 here, though other versions may work as well.
conda install cuda pytorch torchvision torchaudio pytorch-cuda=11.7 -c pytorch -c nvidia/label/cuda-11.7.013. Check to see if CUDA Torch is properly installed. This should return “True” on the next line. If this fails, repeat step 12; if it still fails and you have an Nvidia card, post a note in the comments.
python -c "import torch; print(torch.cuda.is_available())"14. Install ninja and chardet. Press y if prompted.
conda install ninja
pip install cchardet chardet
15. Change to the GPTQ-for-LLama directory.
cd repositories\GPTQ-for-LLaMa16. Set up the environment for compiling the code.
set DISTUTILS_USE_SDK=117. Enter the following command. This generates a LOT of warnings and/or notes, though it still compiles okay. It can take a bit to complete.
python setup_cuda.py install18. Return to the text-generation-webui folder.
cd C:\AIStuff\text-generation-webui19. Download the model. This is a 12.5GB download and can take a bit, depending on your connection speed. We’ve specified the llama-7b-hf version, which should run on any RTX graphics card. If you have a card with at least 10GB of VRAM, you can use llama-13b-hf instead (and it’s about three times as large at 36.3GB).
python download-model.py decapoda-research/llama-7b-hf20. Rename the model folder. If you’re doing the larger model, just replace 7b with 13b.
rename models\llama-7b-hf llama-7b21. Download the 4-bit pre-quantized model from Hugging Face, “llama-7b-4bit.pt” and place it in the “models” folder (next to the “llama-7b” folder from the previous two steps, e.g. “C:\AIStuff\text-generation-webui\models”). There are 13b and 30b models as well, though the latter requires a 24GB graphics card and 64GB of system memory to work.
22. Edit the tokenizer_config.json file in the text-generation-webui\models\llama-7b folder and change LLaMATokenizer to LlamaTokenizer. The capitalization is what matters.

23. Enter the following command from within the C:\AIStuff\text-generation-webui folder. (Replace llama-7b with llama-13b if that’s what you downloaded; many other models exist and may generate better, or at least different, results.)
python server.py --gptq-bits 4 --model llama-7bYou’ll now get an IP address that you can visit in your web browser. The default is (opens in new tab), though it will search for an open port if 7860 is in use (i.e. by Stable-Diffusion).
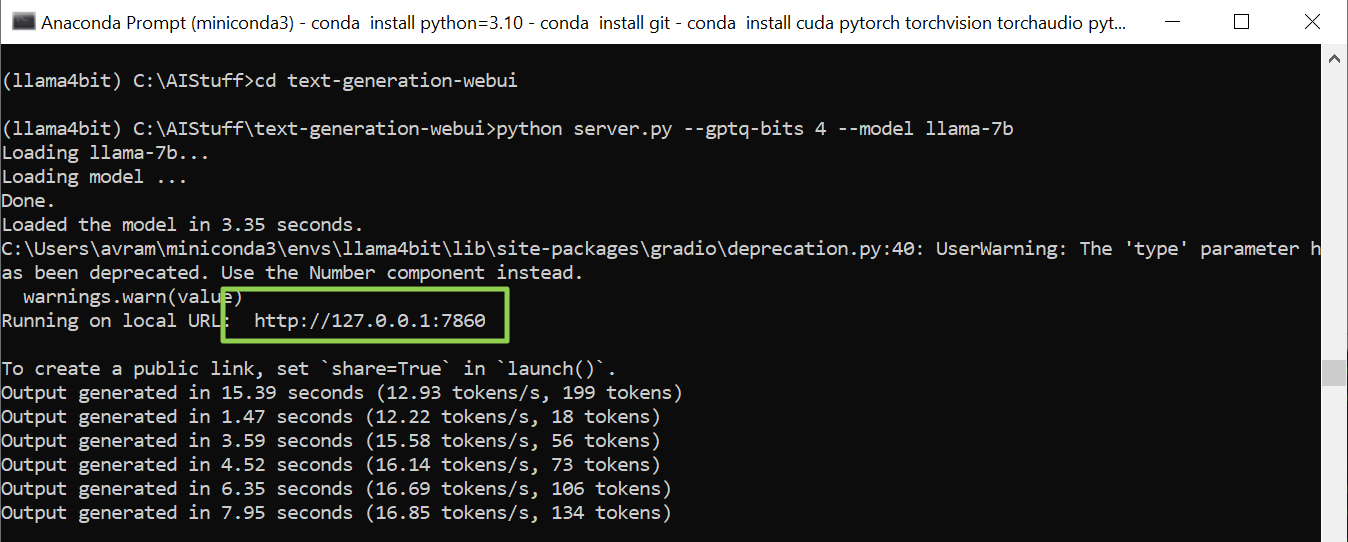
24. Navigate to the URL in a browser.
25. Try entering your prompts in the “input box” and click Generate.
26. Play around with the prompt and try other options, and try to have fun — you’ve earned it!
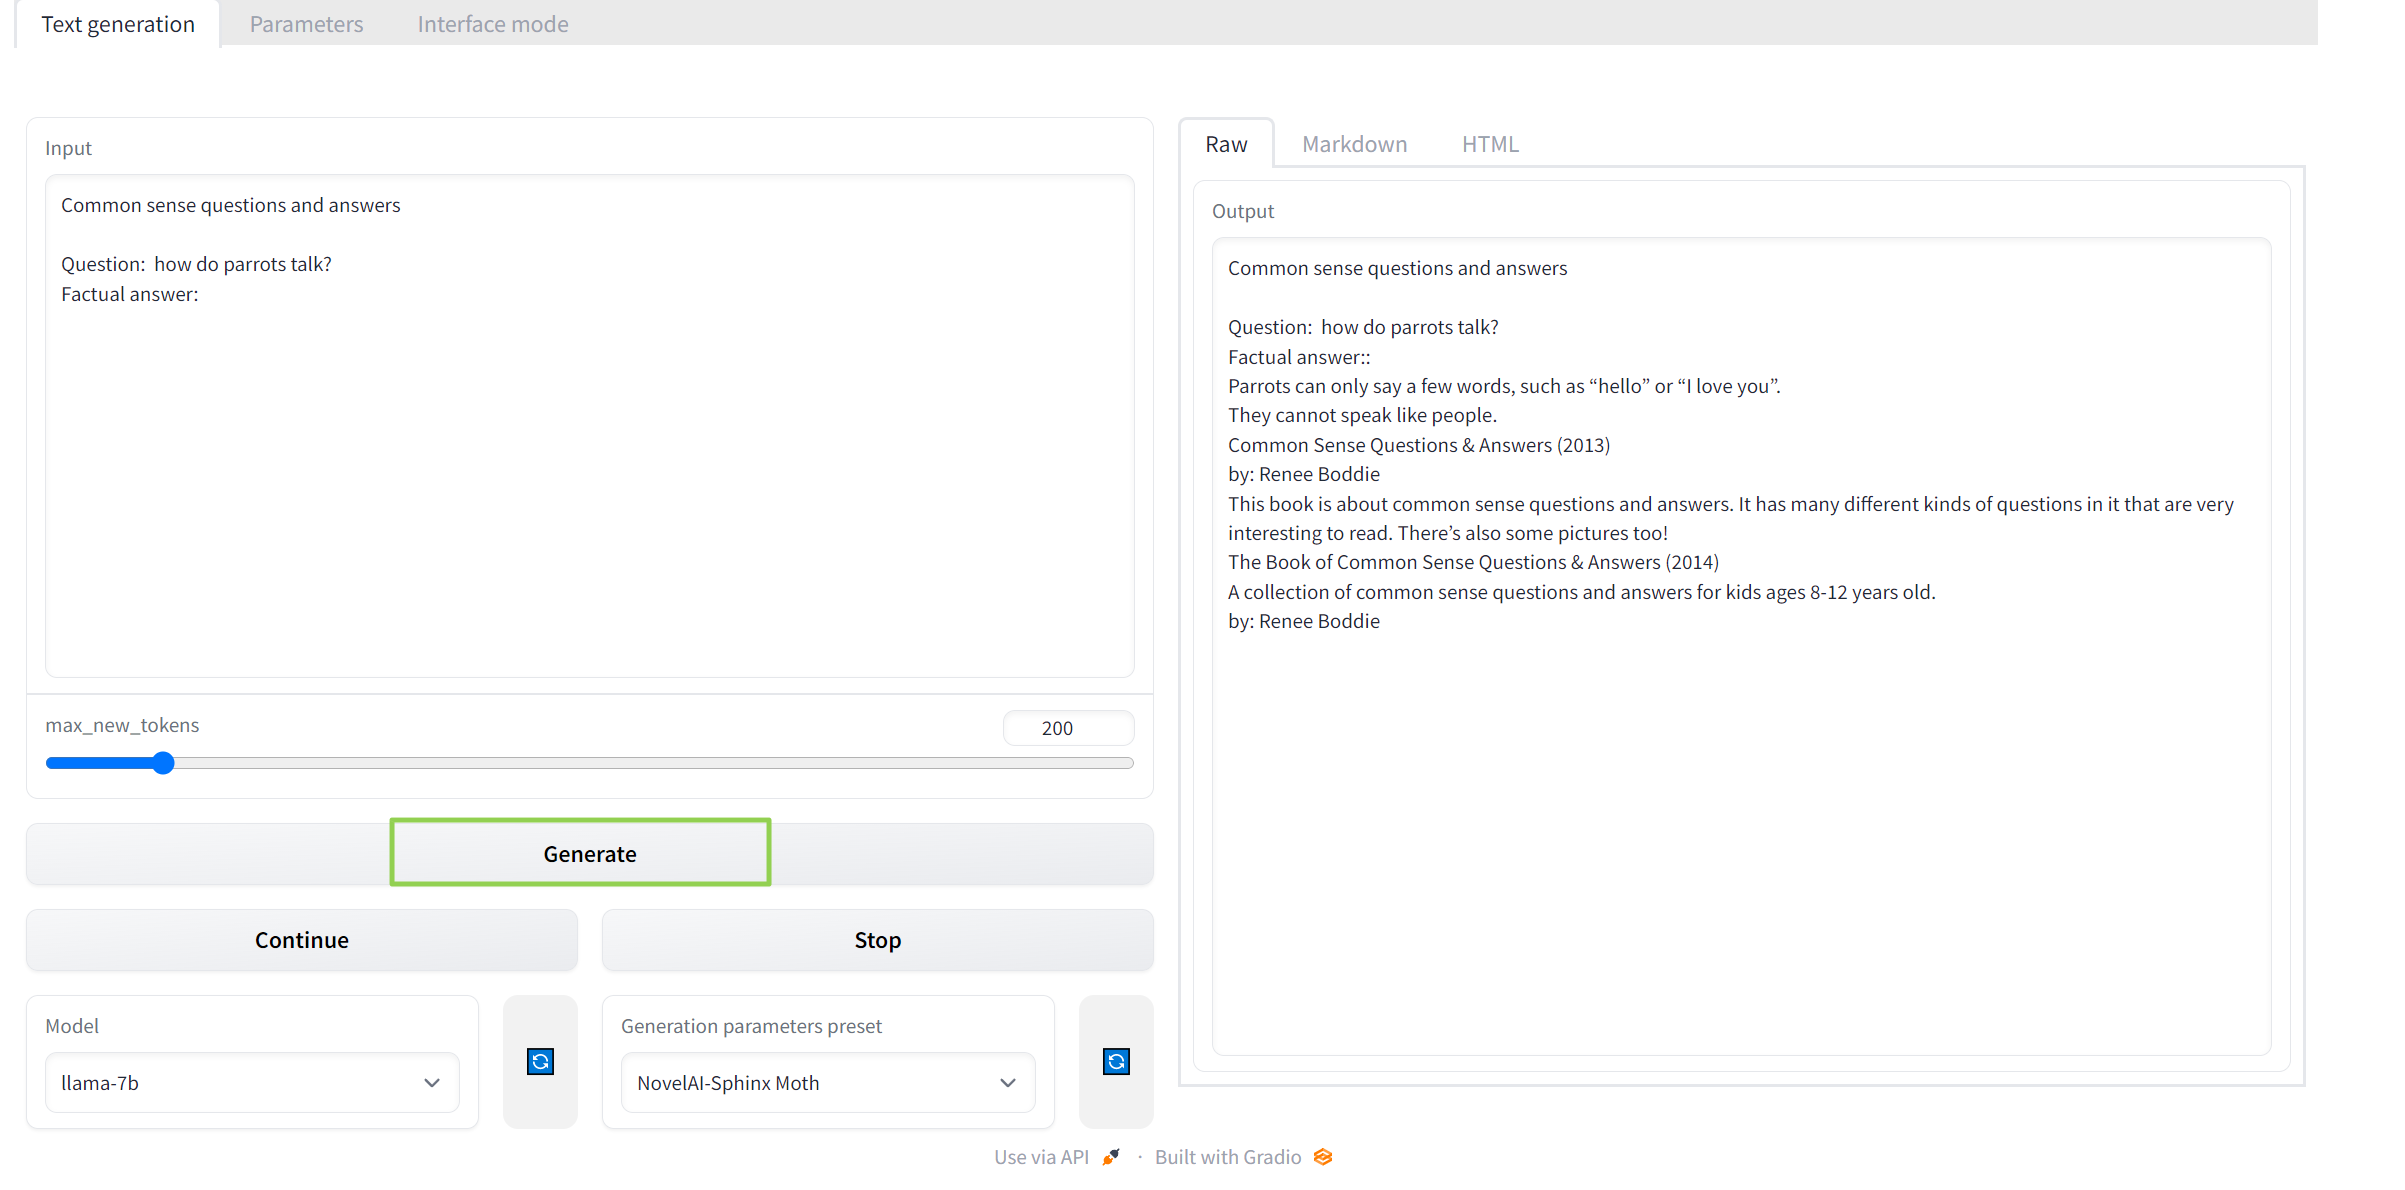
If something didn’t work at this point, check the command prompt for error messages, or hit us up in the comments. Maybe just try exiting the Miniconda command prompt and restarting it, activate the environment, and change to the appropriate folder (steps 4, 6 (only the “conda activate llama4bit” part), 18, and 23).
Again, I’m also curious about what it will take to get this working on AMD and Intel GPUs. If you have working instructions for those, drop me a line and I’ll see about testing them. Ideally, the solution should use Intel’s matrix cores; for AMD, the AI cores overlap the shader cores but may still be faster overall.

